 What is Accuracy? The accuracy of a measurement by Vernier Calipers is defined by how near it is to the actual or true value, according to ISO 5725-1. In the case of multiple measurements of the same object, the accuracy takes into account the effect of random and systematic errors. The term accuracy is also used for calculations in the same manner, telling us how close the calculation is to actual values. The term precision is also used to describe the exactness of a measurement which is dictated by the number of decimal places in the value.
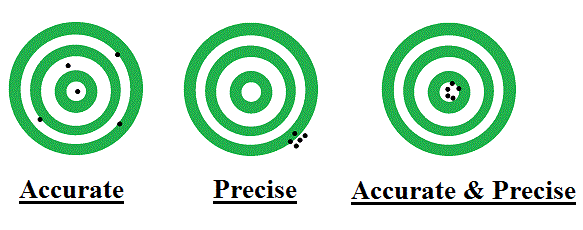
What is Precision? When talking about a set of measurements by Vernier Calipers, the term precision is used to describe how close the measured values are to each other. This doesn’t necessarily mean that the values are correct. A set of values can be precise but inaccurate at the same time as demonstrated by the image below:
Accuracy & Precision of Vernier Calipers
Accuracy and Precision are often linked with the two types of errors. Accuracy is related to the systematic error in a set of measurements while precision is attributed with random errors.
Random error is a result of unpredictable irregularities that can occur while taking the same measurement. This can occur due to some variation in the apparatus or could be a result of a difference of observation while reading the instrument by the user. The nature of random errors is such that they are always associated with measuring instruments like the vernier caliper and cause a variance in the readings for the same measurement. However their effect can be minimized by repeating the measurement and taking the average of the results.
Systematic errors are associated with inaccuracies in the instrument or methods being used to take the measurements. This makes it impossible to eliminate it’s effects by the averaging method since all the values will differ in a similar direction. To eliminate systematic error it is necessary to find its cause. This can be in the form of improper calibration of the Vernier caliper, a wrong method being used to take measurements or even an effect of the environment on the process. Zero errors caused by improper alignment of the instrument are an example of a systematic error.
Example Difference for Accuracy and Precision
Reading Sample 1:
if an object’s length true value is 10 mm. One person takes the readings of object by Vernier Caliper as 10.02 mm, 10.01 mm, 10.03mm, 10.01 mm and 10.05 mm.
Reading Sample 2:
The other takes the readings as 10.10, 10.09, 10.10, 10.09 and 10.10.
Conclusion:
So the first set of readings is more accurate and less precise while the second set of readings is more precise and less accurate.


How accuracy can be increased of vernier caliper