 Most of the previous discussion on our site has been regarding vernier and digital calipers which are primarily used to measure the lengths and diameters of objects. Although most of these tools come equipped with depth gauges capable of measuring steps and small depths, sometimes the heights of objects need to be measured accurately. This is where the digital vernier height gauge comes in.
Height gauges are specialized tools to measure the difference in elevation between two points. They are basically a variation of the regular vernier digital calipers and can perform similar functions like measuring internal and external diameters in addition to step measurements and center line distances. Height gauges normally have accuracies of +- 0.001 inches and good quality gauges boast consistencies of about +/- 0.0001 inches.
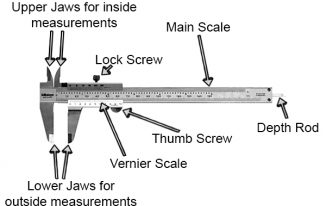
Digital Vernier height gauges are made from stainless steel with a rigid base made form solid cast iron which provides stability for measurements. The vertical beam which includes the measuring scale is attached to the base. The scale is similar to a regular vernier scale with distances marked in both inches and millimetres. The usual measuring range for digital vernier height gauges is up to 12 inches or 300mm although they can extend to 80 inches or 2000mm.
The beam supports the movement of the attached electronic slider which holds the display and the control buttons for adjustment and setting the zero position. A defining feature of the slider is the carbide scriber attached to it which is used to mark distances for later work. The slider moves up and down the scale and is fixed in its final position by the lock screws.
Next we will highlight the process of taking measurements with the height gauge:
- The first step like using any instrument is to clean the work area and make sure the surface on which the gauge is to be set up is smooth and free from dirt.
- Next clean and dry the surface of the height gauge
- Now attach the measuring jaw of the height gauge and clean it as well
- Next loosen the locking screws so that the slider is free to move on the scale. Move the slider up and down as well to check if the display is registering changes in height.
- The next step is to clean and dry the surface of the object which needs to be measured
Once the cleaning and preparation is done with we can start with the actual measuring process.
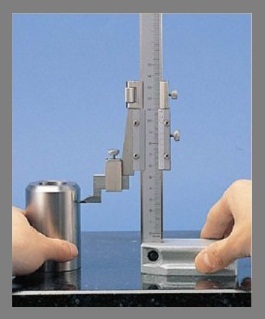
- The first step is to set a point of reference which in most cases is the surface of the work table. To set the reference position the measuring jaw such that it gently touches the surface. The reading on the display should be zero at this point. If not, then press the ON/OFF or Zero button to make it so.
- Now place the object to be measured on the work table and move the jaw up so that it rests gently on the top surface of the object. Adjust the lock screws to hold the slider in place.
- Now read the reading on the display to find out the height of the desired object.
If the height of the object is greater than the range of the height gauge then a simple method can be used. Lift the base of the height gauge and place it on a block. Now the reference point can be taken as the surface of the block. Measure the height of the block separately and take the object measurements from the surface of the block. In the end just add the height of the block to the total measurement to get the total height of the object.